


Hello friends 👋, in this article we will pick up from where we left off in the previous article, and proceed to making the M-Pesa STK Push Trigger Request.
Things to be covered in this article include:
- Capturing the API Required Parameters
- Testing the Lipa na M-Pesa API on Postman
- Making the GET and POST http requests from flutter App; sending the M-Pesa STK Push Trigger request.
Testing the API on Postman:
Prerequisites:
- Credentials (username and password) for accessing the API.
- M-Pesa registered phone number of the customer making the payment.
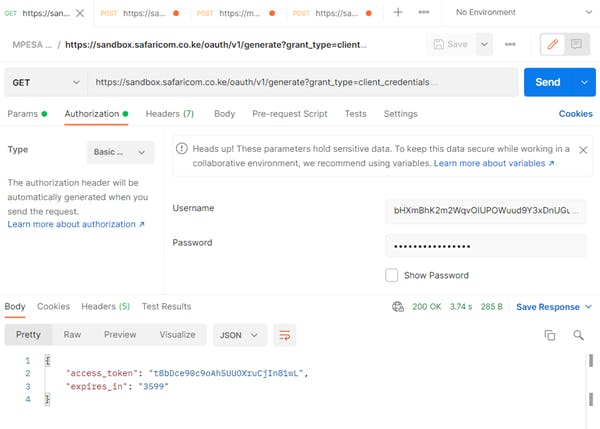
Step 1: Generate the client credentials.
Bearer Token authorization is required when accessing the LIPA NA M-PESA ONLINE API. The first step therefore will be to generate these client credentials using the username and password given when creating the sandbox app on Safaricom Developers Portal.
The screenshot below shows the http GET request to generate access_token.
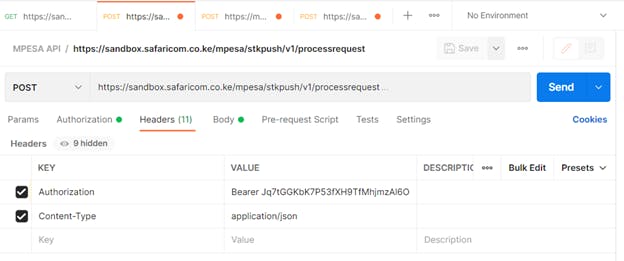
Step 2: Send a STK Push trigger request
Using the acess_token obtained in step 1 above, a STK Push trigger request is then sent to the https://sandbox.safaricom.co.ke/mpesa/stkpush/v1/processrequest endpoint.
2.1: Authorization:
Using the access_token obtained from step 1 above.

2.2: Headers:
2.3: Body:
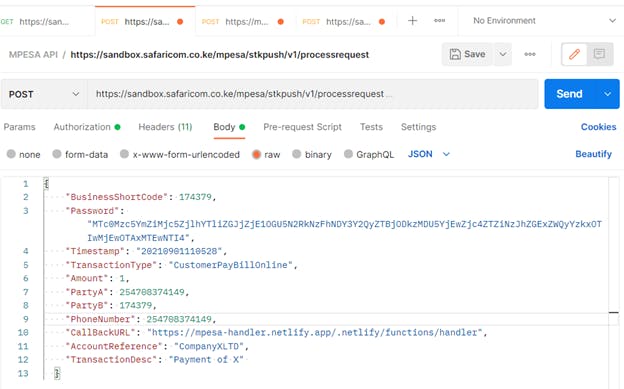 Request Parameter Description:
- BusinesShortCode: also paybill number. This is a unique code through which the customers’ payment will be received.
- Amount: the money to be paid by the customer to the Business.
- Party A: M-PESA registered phone number of the customer making the payment.
- Party B: the paybill (unique short code) through which the customers’ payment will be received.
- PhoneNumber: The mobile number to receive the STK Pin Prompt.
- CallbackURL: the endpoint to which the results of the transaction will be sent by M-Pesa API upon completion of the transaction.
- AccountReference: the business name that will be displayed to the customer in the STK Pin Prompt message.
More information on the Request Parameter description can be found on Daraja API Documentation.
With the above parameters set, a POST request can then be sent to the Lipa na Mpesa Online endpoint at https://sandbox.safaricom.co.ke/mpesa/stkpush/v1/processrequest.
An acknowledgement response will be received on success as shown below:
 A payment prompt is then sent to the customer’s phone requesting them to enter their M-PESA pin to authorize and complete a payment.
Integrating the STK Push Trigger Request Process into Flutter App.
Once the API has been tested on Postman and everything is working as it should. Its now time to integrate the process described above into our flutter app. The integration will therefore take the following steps:
Step 1: Capture the required API Parameters.
At this point the user interface capturing the necessary customer information should be ready. This could be a check out page, capturing the necessary payment details.
The key customer details that you need in order to process Lipa na M-pesa Online requests include the customer phone number and the amount to be paid. Other details such as the customer’s name, details of the order | purchase | ticket could also be captured for receipt processing but are not required for processing Lipa na M-Pesa Online.
As a business; you’ll require a paybill number in order to integrate Lipa na M-Pesa online. This will be a unique code through which the customers’ payment will be received . More information on the paybill application process can be found here.
Step 2: Install http
In order to consume the Lipa na M-pesa Online, we’ll be required to make GET and POST http requests; the flutter http package will therefore be required. Further instructions on the installation and use of the package can be found the documentation here.
Step 3: Get client credentials
Once again the username and password given from the Developers Portal will be required for Basic Auth when making the GET request in order to obtain the access_token for accessing Lipa na M-Pesa Online API.
Note, the username and password can be stored as environment variables in a .env file. To do this make use of the flutter-config package. More details on the installation and use of this package can be obtained here.
Step 3.1: Encoding the username and password
The username and password are encoded in base64 format before being passed in the headers when making the request.
The encoding is done as shown below:
String basicAuth = 'Basic ' + base64Encode(utf8.encode('$_username:$_password'));
Step 3.2: http GET request
Once the encoding is done, a http GET request can then be made to access the credentials as follows:
await http.get(
    Uri.parse('https://sandbox.safaricom.co.ke/oauth/v1/generate?grant_type=client_credentials'),
    headers: {'authorization': basicAuth}
);
This request returns a JSON response, with the access_token required when making the STK Push trigger request.

Step 4: Make the STK Push Trigger request.
The STK Push Trigger request is a POST request as was seen in the section above. The access_token will be provided in the headers for authorization and the request body will be as shown below:
Uri.parse('https://sandbox.safaricom.co.ke/mpesa/stkpush/v1/processrequest'),
    headers: {
      'Authorization': 'Bearer ${accessCredentials.accessToken}',
      'Content-Type': 'application/json',
      'Accept': 'application/json',
    },
    body: jsonEncode({
      "BusinessShortCode": 174379,
      "Password": "MTc0Mzc5YmZiMjc5ZjlhYTliZGJjZjE1OGU5N2RkNzFhNDY3Y2QyZTBjODkzMDU5YjEwZjc4ZTZiNzJhZGExZWQyYzkxOTIwMjEwOTAxMTEwNTI4",
      "Timestamp": "20210901110528",
      "TransactionType": "CustomerPayBillOnline",
      "Amount": amount,
      "PartyA": phoneNumber,
      "PartyB": 174379,
      "PhoneNumber": phoneNumber,
      "CallBackURL": "https://mydomain.com/path",
      "AccountReference": "CHATMATE",
      "TransactionDesc": "Payment of X"
    })
The request gives us the following response:
 The response obtained is similar to what we saw on Postman, acknowledging that the request has been received; and a STK Push Prompt has been sent to the customer, requesting them to enter their M-PESA pin to authorize and complete the payment.
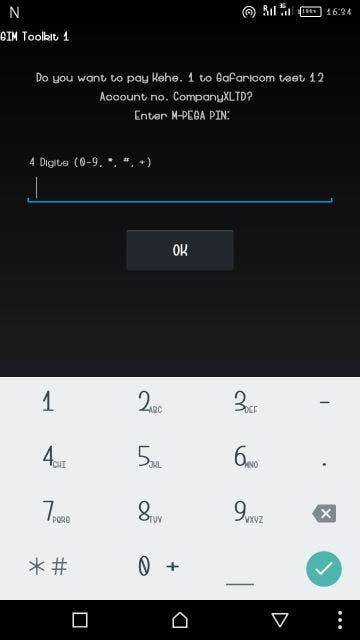
Up to this point, on pressing the checkout button, the client should be able to see the STK Prompt requesting for their pin as shown below:
 I hope you’ve enjoyed this piece so far. At this point the STK Prompt has been sent to the customer; and the customer can either enter their pin, authorizing and completing the payment or cancel the payment. How to determine and handle this will be covered in this next article here.
Till then, happy coding 🤠
P.S. The code demonstrating what has been covered in this article can be found on the Github repository here.
Resources:
Credits:
- Cover photo from unDraw illustrations on Pexels.