Hello friends 👋, picking up from where we left off in the previous article; an M-Pesa STK Prompt has been sent to the customer; the customer can now input their pin, thus authorizing and completing the payment. However, there are instances whereby the request gets cancelled. The customer can explicitly cancel the request or the request could also be canceled due to timeout. Therefore, determining the status of a Lipa na M-pesa Online payment and the getting information on the transaction details (whether the transaction was successful or not) is very essential when integrating Lipa na M-Pesa Online into your application.
In this article we'll cover:
- Determining the status a Lipa na M-pesa Online payment
- Capturing the M-Pesa webhook
- Creating a simple M-Pesa webhook handler
1. Determining the status of a Lipa na M-Pesa Online Payment
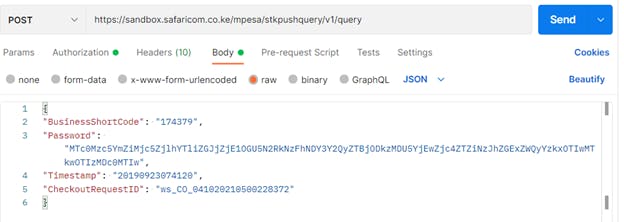
One quick way to determine the status of a Lipa na M-pesa Online payment is through the Lipa na M-Pesa Online Query API. Similar to the STK Push Trigger request, this API uses the bearer token authorization. A POST request is sent to the Lipa na M-Pesa Online Query endpoint at https://sandbox.safaricom.co.ke/mpesa/stkpushquery/v1/query.
The request body is as shown in the screen shot below:
 Note, the
 CheckoutRequestID was provided as a response to the STK Push Trigger request. This is the unique key identifying the specific payment | transaction. Check out the previous article here for more information on the STK Push Trigger request.
A response to this request (Lipa na M-Pesa Online Query), provides details on whether the request is in process, completed or cancelled by the customer.
The screenshot below shows a sample of the response from the Lipa na M-Pesa Online Query API:

2. Capturing M-Pesa webhook
Instead of continually polling the Lipa na M-Pesa Online Query API in order to determine the status of a payment, Lipa na M-Pesa Online utilizes webhooks to POST the payment details to the provided CallBackURL once the transaction is complete.
Note, the CallBackURL was provided when making the STK Push Trigger request.
A quick solution to viewing the POST request details sent to the CallBackURL, would be to use a mocking tool such as Beeceptor.
Using Beeceptor, one can create endpoints (CallBackURL) to which the POST requests can be sent and inspected.
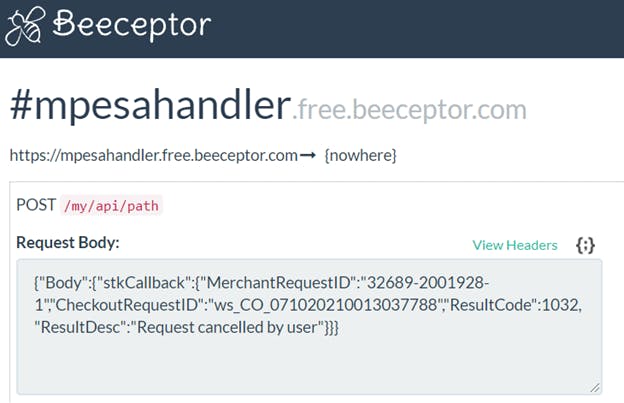
The screenshot below shows the M-Pesa transaction details posted to the endpoint(CallBackURL) created at Beeceptor.

From the webhook captured, more details of the payment can be determined. Looking at the result description - ResultDesc , it can be determined that the user cancelled the request.
3. Creating a simple M-Pesa webhook handler
From the above sections, we can see that very useful information is POSTed to the CallBackURL regarding the transaction | payment details. All this information is required in order to complete processing the customer’s purchase | order on the application side.
A simple server could therefore be setup to handle the POST requests received via M-Pesa webhook.
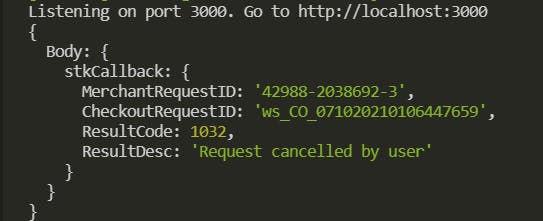
For this particular article, a simple express app could be created as shown below. Upon the receiving the POSTed data, we are simply going to console.log() to view the data.
Note, more information on installation and getting started with express app can be found here.
// Requirements
const express = require('express');
const axios = require('axios');

// ----------------------------------------------

// Express app
const app = express();

app.use(express.json());

// ----------------------------------------------

// Routes

app.get("/", (req, res) => {
    res.send("<h1>Chatmate Mpesa Webhook Handler</h1>");
});

app.post("/handler", (req, res) => {
    console.log(req.body.Body.stkCallback);
});

// ----------------------------------------------

// Listen
app.listen(3000, function(){
    console.log("Listening on port 3000. Go to http://localhost:3000");
});
Starting the server:
 Once the server is up and running on port 3000; the next step is to make our localhost server publicly accessible. Remember, the
 CallBackURL has to be a publicly accessible url, however using localhost:3000, our server is only accessible locally. In order to expose the local server port to the internet, we’ll need a tool called Ngrok, to open up a tunnel on our local machine making our localhost sever accessible from the internet.
Note, more details on installation and use of ngrok can be found here.
The screenshot below shows the publicly accessible URL provided by ngrok that maps to our localhost server. This url is then what will be provided as the CallBackURL when making the STK Push Trigger request.
 The webhook was therefore captured and the payment details logged as shown in the screenshot below:
 Upto this point, we’ve been able to capture the payment details sent via the webhook. These details could be sent to a database and used in completion of the payment process on the application side.
Our current solution entails setting up a simple server, which can then be deployed for example on heroku or other hosting platforms. Alternatively, instead of setting up a server just to handle the POST requests received via the M-Pesa webhook, we could make use of serverless cloud functions such as Firebase Cloud Functions, Netlify functions, Azure functions and so on. The cloud function containing the webhook handler would be assigned a unique url(CallBackURL), and when a POST request is made to the url, the cloud function would be excuted.
I hope this series has been helpful.
Any thoughts and comments, would love to hear those!
Till next time, happy coding 🤠
Resources:
Credits:
- Cover photo from unDraw illustrations on Pexels.

